Saturday 30 June 2012

Not Again!!! Back in Plaster......

This is a picture of my right leg encased in a very fetching purple plaster cast! 
I am bed bound for a week after breaking a bone in my ankle playing tennis earlier this week.
Luckily the break is not anywhere near as painful as when I broke my wrist last October and they don't think I will have to be in the plaster itself for more than two weeks.
If all goes to plan I will then wear one of those 'diver' boots for a further 4 weeks.
I can feel a lot of internet browsing and shopping coming on!!
My daughter's graduation is in the middle of July I really do not want to still be in plaster then.
Posh frock. Big boot. Great for photographs. 
Oh well we will all still be able to celebrate.

Saturday 16 June 2012

A True Craftsman......Rob Lucas Bookcases for Flourish and Blotts

Apologies for taking so long to share with you the delivery of my bookcases this week but if I explain that the quality of photograph is not wonderful because my camera is with my youngest son in Thailand, my old camera is with my eldest son in Cornwall and my very old camera is with my daughter in Dubai you may have some understanding of what my week has been like!
All I know is I am sitting at home enjoying our wonderful 'Flaming June' weather.
I am, however, very pleased to show these photographs that I have taken with my phone.
I had asked Rob Lucas of World of My Own Miniatures to make these for me as his unfinished furniture is perfectly scaled and beautifully crafted. Despite my very careful plans I opened the box with some trepidation I must admit but I really shouldn't have worried. 
 These are the ground floor units that have slotted in perfectly....
 ......with the end bookcase climbing right up to the the first floor where it joins on beautifully.
 The top floor has two side bookcases.....
......which match up with mm precision with the very long back book case. 
I asked for the shelves to range in heights to accommodate differently sized books and I hope you can see this.
 Here is the ground floor with staircase (Grrrrr!! Still can't look at it with love!), counters and back door in situ.
 The staircase will also have a balcony railing when it is finally glued in place but I haven't given that a great deal of thought yet.
 This photo does make it all look rather grand doesn't it. I love the way the tall bookcase climbs beyond the staircase.
Now this is an awful photo but you get the idea. This unit will sit behind the counters and be full of paperwork and reserved items, overflowing and in a truly wizarding muddle of course. 
I also have a number of units which will line the interior front door panel to finish off the look completely.
I don't know if you can tell how well made these units are but I am so happy with them. I did work hard on the plans but Rob has followed my measurements to the mm. They all slotted into place like a dream.
I can now add the floorboards, I left these til last just in case my measurements were slightly off, but I am not sure whether to lay the whole floor or measure up to each bookcase. 
I think I will get a cleaner look if I lay the whole floor.
So exciting! I feel I can really push on with the project now!
Have a fun weekend everyone.

Sunday 10 June 2012

How Many Wood Stains/Varnishes/Waxes Does it Take to Make a Decision?

Too many! With my bookcases due to arrive on Tuesday I have been playing with colours today. I want the flooring to be a deep, rich mahogany with a waxed sheen which sounds quite simple. The floorboards are cut from mahogany so all I need to do is enhance the natural wood.
The only problem being that I don't want the colour to be too red. I am not a great fan of the red mahogany you see on a lot of dolls house furniture. So I have been experimenting.......
Then, using the backs of a couple of pieces of furniture I have been trying out all sorts of finishes for the bookcase units. Again I want a very deep mahogany without the red......As there are so many bookcases I also need the finish to go easily and have depth from the start otherwise I could be staining and waxing until next Christmas!!!
At the moment I think I am looking at woodstain, 2 coats followed by at least two coats of coloured wax. 
Or maybe a coat of porcelain paint ( strange but it works ), followed by 2 coats of woodstain and then the wax.
I will be able to see better in the morning when the light is better and before I run out of practice wood!
 I have also added the first coat of 'grime' to the ArtMache. There are lots of different ways of doing this but because I am so cowardly my method is slow but safe! I make up my pot of dirty wash with ivory black and vandyke brown acrylic paint plus lots of warm water in a jam jar.
 I then paint it on the render and wipe it off with a baby wipe very gently so that I get a variation of depth and colour which you can just see in the photo. Once this coat has dried I then add another and another until I am happy with the level. Lastly I concentrate on particular areas that I feel would be particularly grimy.
I also decided that I would start making some very basic books for the bookcase that I am practising my mahogany finishes on. This bookcase will stand in the false hall behind the back wall door. So I have used some balsa off cuts in different thicknesses and will start the task of filling the overflowing shelves. 
This will also give me the opportunity to look through some mini-book tutorials and have a go at some of the techniques for covering the books.
I have a lovely collection of handmade books by many talented people but I want these to be more on show not hidden away on the shelves.
So 50 books to begin.........2000 more to go!
If anyone knows of any good online mini book tutorials I would be very grateful for the links.

Friday 8 June 2012

Flourish & Blotts is Showing Off!!

Gosh how time flies when the weather is awful and your three children return from a year at Uni! How do you get all the washing dry when it won't stop raining!!??
Well I have finally got out of the utility room, one end of my lounge looks like a car boot sale and the ironing board has been banished for the weekend.....so here are some pictures of what I have managed to fit in over the last few weeks.
 Lots of brickwork beginning with the front panel and the paving paviors from Richard Stacey
 Both side walls follow the same pattern and all the bricks have been sealed and grouted. This was a very long job but quite calming once you get into the swing of it.
 The roof is quite large on this shop and I wanted to avoid using ridge tiles along the roof joins as I didn't like the look of these joins on my previous corner kits. At the edge I  have sanded down the roof tiles.
Once I had finished the roof tiling on both sides, front and back I laid a line of over lapping roof tiles down each edge after sanding them flat.
I am really happy with this tile frill as it looks a lot neater than the traditional ridge tiles.
The top line of the roof still needed the finishing touch of traditional ridge tiles though so I wandered the streets of my village peering closely at various Georgian houses, with the dog so I would not be mistaken for a peeping Tom!!
This was very instructional as I discovered that the tiles were stuck on with mortar and this allowed them to sit proudly. 
 I built up a ridge of grout along the top and then squidged the ridge tiles in place. This worked really well once I had also added some PVA to the grout to make sure the tiles stayed in place.
This is a large roof space and tiling was very time consuming!!
 Although the roof tiles are a variety of colours I decided to try my hand a more paint effects after my roof research. This is the first layer of grime and I have gradually built up darker layers.
 This Sid Cooke kit comes with two lower round bay windows but I wanted top bays as well. Sid Cooke are now selling extra parts for their kits which meant I could add the extra bays with a bit of tweaking.
 The fit of the top bays is by no means perfect as the window openings are the wrong size but I am doing my best to hide this with paint and mouldings.
 Flourish and Blotts' exterior with the vast majority of the grunt work completed. Windows in, brickwork distressed and ArtMache render drying off nicely.
 This time I went back to the tried and trusted method of marking where all the mouldings would be glued and then laying on the ArtMache. I have not glued in the window panes yet as I want to be able to dress the windows from all angles.......eventually!!
 The brickwork and roof do look a lot more aged in real life but they still need a couple more coats of grime I think. The 'bashed' top bays were a little fiddly to install but a lot of PVA plus the render appear to have fixed them in place quite solidly.
 Once the render is completely dry I will be able to start the griming and ageing. These layers will really bring the whole shop together.
 The 'bashed' top bays were too wide for the pre-cut openings so I have painted and crackled a strip along the side to imitate the black/gold interior and wood work. This blends in surprisingly well although the interior will need a bit more work.
Lastly I have made this little oblong balsa box for the back door of the shop which will be a false hallway complete with book piles and bustling customer I hope.
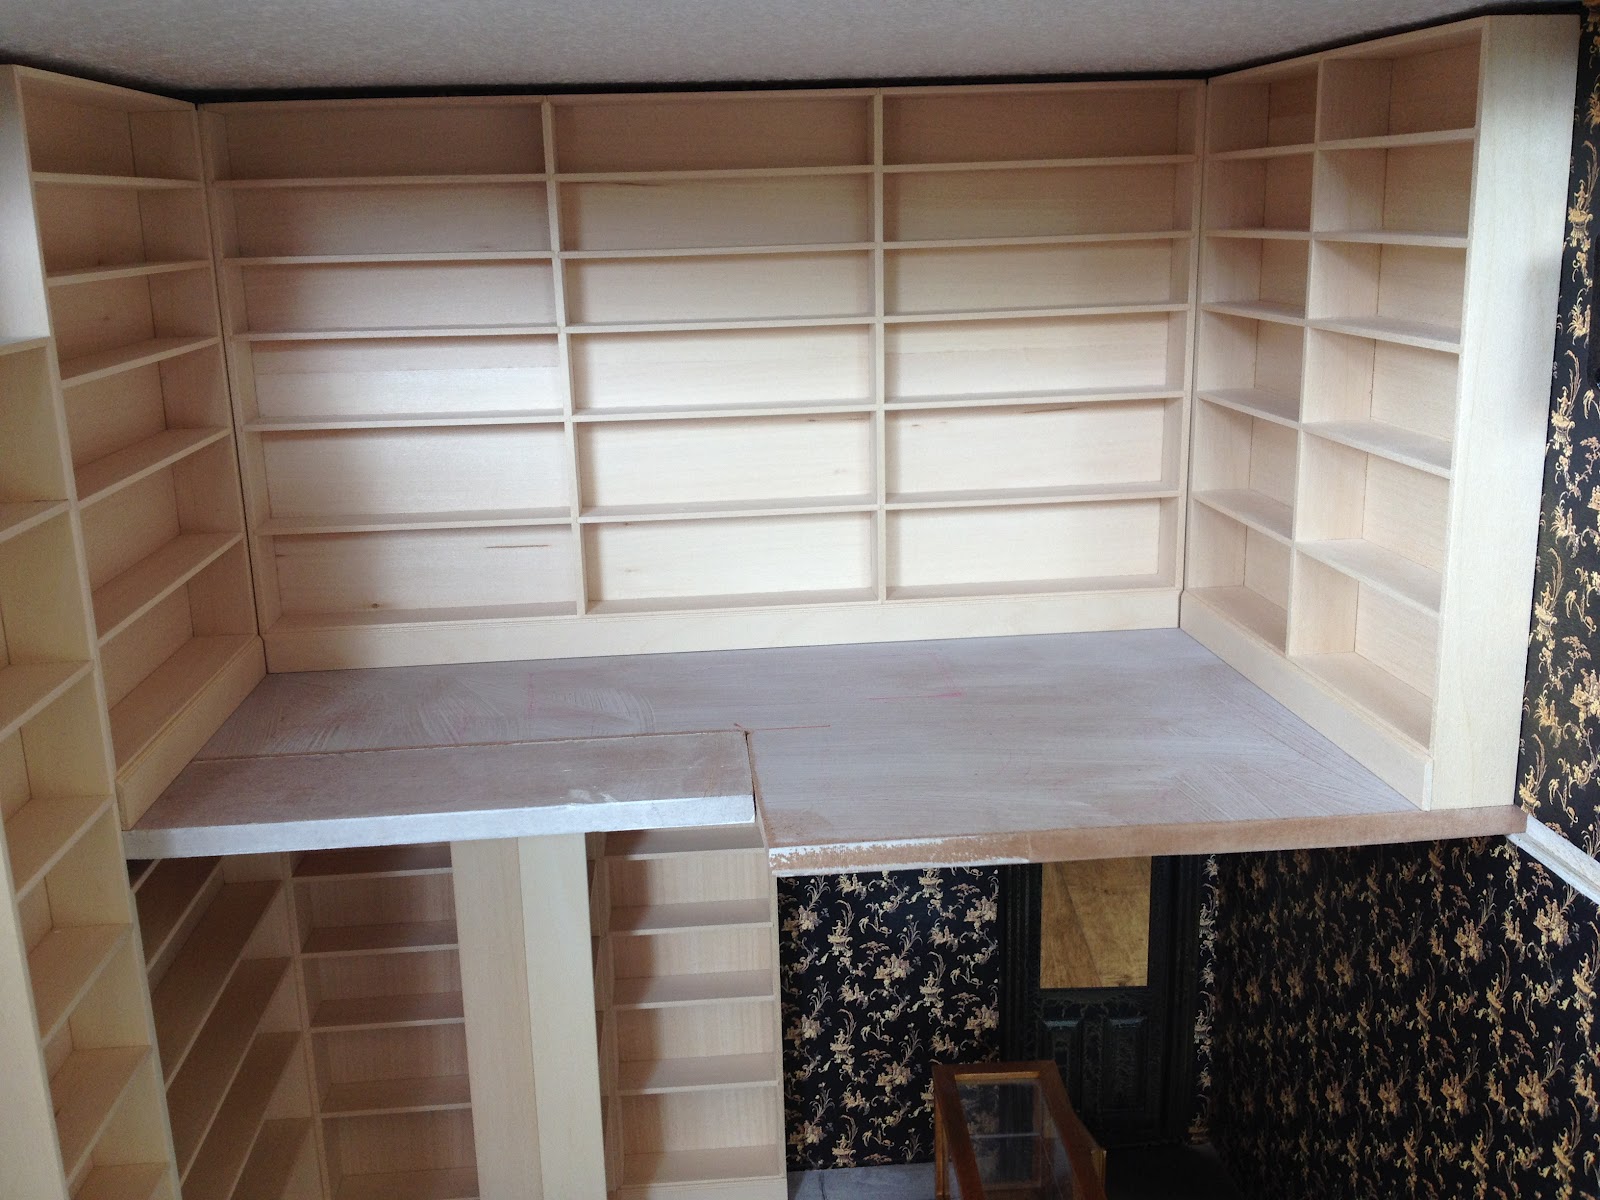
I have commissioned the made to measure bookcases and they are due to arrive on Tuesday which is very exciting but also completely terrifying. I prepared all the measurements and plans so if they don't fit it will be a very expensive mistake. They are the biggest commission I have ever made so I am keeping everything crossed at the moment!!
The sun is supposed to shine tomorrow, oh wouldn't that be nice!!
Have a great weekend everyone.